Pages

Tuesday, 25 October 2016

Read the card, choose your own texture


Some time ago I found an insignificant looking piece of paper and got so excited that I reproduced it and passed it around to any machine knitting friends nearby. No one shared my enthusiasm, but I'll put it here. This chart refers to the Silver Reed  (Studio/Singer/Knitmaster)  24 stitch punchcard machines. I think it is accurate for the Brother punchcard machines as well.


Below are some photos illustrating just one way of using a favourite card, Singer/Studio/Knitmaster Card 4, using tuck stitch and needle selection to make a fabric with sections of different textures, and as a bonus, an automatic wavy edge.


Each needle is controlled by just one column on the card, so with reference to the chart, you can see that there is a 4 stitch pattern repeat, with two needles knitting every row, and two needles alternately knitting and tucking. If you take the needles that knit all the time out of work, you will get an all over  tuck pattern. If you remove from work the needles that tuck, you will get stocking stitch. Study the markings on your needle bed and you will be able to work out which needles are tucking and which are knitting. If you alternate between a few needles tucking and a few needles knitting, you will get nicely contrasting textures in either lacy or solid knit, depending on your yarn and tension.

 Hints
  1.  It helps to start by identifying what the middle 2 needles are doing, then work outwards from there.
  2.  Selecting needles that knit for the edges makes for neat edges.


Friday, 1 April 2016

Swag Blanket Mk2

I've been pleased with my large blankets, useful as outer garments and for many household and travelling purposes. However, although simple, the knitting process was not quite as simple as I would like. Knitting neat edges was not an automatic process. To overcome this I modified Singer/Studio/Knitmaster Card 7 so that I could position two columns of knit stitches on each edge. Of course this meant that two columns in every 24 do not tuck, adding an interesting textural stripe to the fabric. The occasional seersucker type stripe effect is best seen in this project knitted by Marlene.


The seersucker effect comes about because the dominant tuck stitch makes the piece shorter and wider than a plain stocking stitch piece with the same number of stitches and rows. The stitches in the columns where all stitches are knitted are longer than the tuck patterned stitches so they pucker.

This is a modified Singer/Studio/Knitmaster Card 7


The middle two columns are punched out so that the corresponding needles will knit every row. To get a neat selvedge, position the edge where there are columns of knit stitches.


Here is the latest of my enormous, but lightweight blankets, pegged out on the rotary clothes line to show the area and the textured stripes.


This is a simple knitting process. Marlene's project was her first ever on a standard gauge punchcard machine. Some lovely yarn and a simple project made for a happy first experience.
I like the texture so much I will make another modified Card 7 with punched out columns on the edges as well as the center of the card. 

Tuesday, 26 January 2016

Circling the Square


Short rows can make knitting endlessly interesting
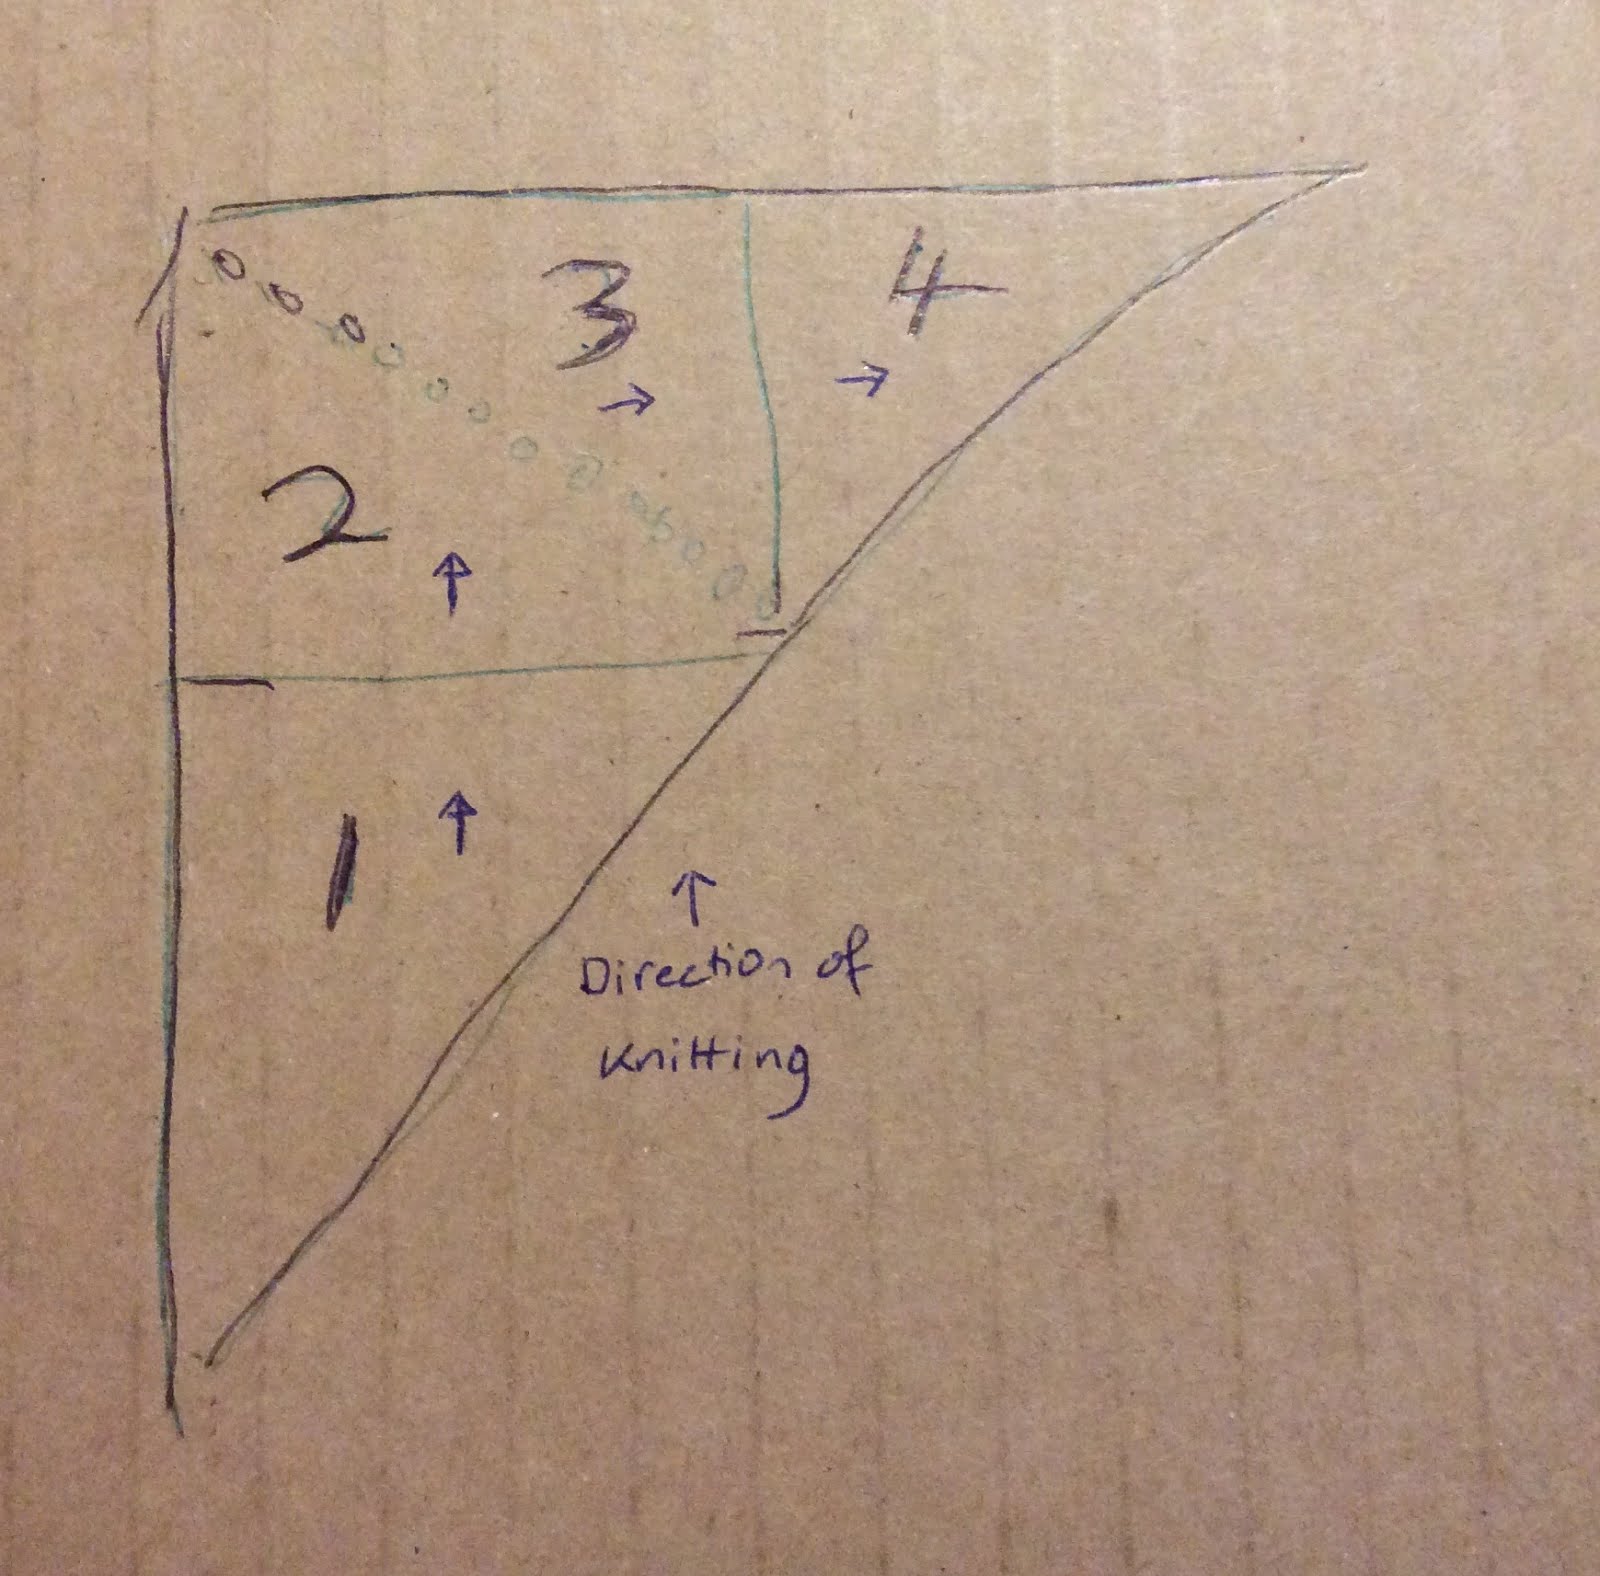
As part of our machine knitting summer school for new knitters we played with short rows to make different shapes. I began thinking about triangles and squares. I think of what we knitted  as being made up of four sections.


Section 1 is start with two stitches and increase one stitch at the right end every two rows
Section 2 is put one stitch at right into hold every two rows until only one stitch is in work.
Section 3 is bring one stitch from hold back into work every two rows,
Section 4 is cast off one stitch at right very two rows.


I can knit a square by knitting section 1 then (2 and 3) three times then section 4. It looks like this


I can also insert plain rows between any of the sections. 


If I start by casting on the full width of stitches and then begin with Section 2 and also insert plain rows each time that I get back to having all the stitches in work it looks like this:


I could cast on with waste yarn and then at the graft the final stitches for an invisible join.  
This could become a skirt,. It could also be the basis of the yoke of a jumper with more rows inserted in two of the sections for the front and back and fewer rows for the sleeve sections.

One of  of the new machine knitters, Maree, made another variation by knitting three segments, with some plain rows in the middle.


When I looked at the shape again I realised that I had previously knitted a cardigan using Sections 2 and 3 twice at the bottom to give a slightly flared hip.  
Details are in my Ravelry projects.
here  and here

These circular knitted pieces can be pulled into a square, or can be used to make other interesting shapes. Since knitting stitches are longer than they are wide there are many different effects depending on how you drape the knitting and how loose the tension is.

Thursday, 31 December 2015

What size a shawl?

On a recent trip to New Zealand, with a travelling wardrobe constrained by the packing limitations of international air travel, my Swag Blanket was used most days. We were not camping, but even so it was usually more comfortable to replace or supplement the supplied bedding with my own, super lightweight, natural fibre blanket.  A couple of times it came out walking in the evening, tossed over my summer clothes, warding off the evening chill.

I was resigned to feeling a little eccentric  until I saw a C19th Paisley Shawl displayed in the excellent Toitu -Otago Settler Museum in Dunedin . The early Scottish settlers had shawls the size of bedspreads. I'm sure such a shawl would do double duty as garment and bedding. I have a couple of phone snaps through glass. I hope they are good enough to give you an idea.


There it is, folded double, with some furniture for scale.

Some detail of the pattern

I like this complex, subtly coloured design. Whether the subdued colour is original or the result of more than a century's worth of fading I am not sure.

I take away from this encouragement to turn my excessive quantity of fine, luxury yarns into very large shawls.

Sunday, 26 April 2015

Swag Blanket - Addedum

My knitting friend Tracy adapted the directions for the Swag Blanket to make a wrap.

You can read all about it on her Ravelry Project page if you are a member of that fine community.

She shared a brilliant little tip for all of us Singer/Studio/Knitmaster knitters. Use an odd number of stitches. That way, when you are using Card 7 Tuck, the end stitch of each row will be the same, selected either to knit or to tuck. Hand select the end needle for the two ends-tucking rows, then have a rest for the next two rows. Neatly halves the amount of hand selection in your project.

I was asked to show my Swag blankets to the Surrey Hills Passap group (Surrey Hills in Melbourne that is), so it seemed only proper to try a Passap version. Now the Passap is a very fine machine, but, if I can be anthropomorphic, rather set in its ways. It is not inclined to co operate with techniques and effects that were not contemplated when the manuals were written. It really doesn't approve of the kind of loose tensioned airy fabrics I rather like to knit. I'm sure it would not do a bit of good to point out that the nimble Japanese machines are only too pleased to collaborate in the production of such textures.

I did manage to knit a sample piece in a stitch that would make a splendidly wide blanket if you have just the right yarn to keep the Passap happy with the stitch pattern.

Swag blanket, the Passap version


The essence of the swag blanket is lightness, airiness and comfortable width achieved using tuck stitch.. The sample demonstrates one way to achieve this. The width on the needlebed was only 15 cm. the swatch has simply relaxed out to 36 cm, no stretching or blocking involved. It was begun and ended on waste yarn and both ends cast off by hand, as I had no cast on technique for the Passap, capable of allowing the fabric to stretch to its widest. Even the experts at Surrey Hills couldn't come up with adequately stretchy castings on and off to accommodate this impressive expansion.

Swatch details,
31 needles brought into work on each of the front and back beds. (62 total)
Bring all 62 pushers out. All pushers on one bed in working position, all on the other bed in resting position.
Begin and end with a couple of N N rows
Select AX and both arrows on each lock
Knit 100 rows at Tension 8